Create AlertDialog With Custom Layout Programmatically (Kotlin)
How to create Create AlertDialog With Custom Layout Programmatically (Kotlin)?
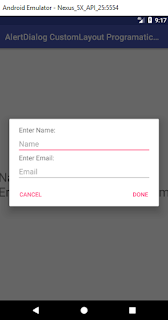
In this tutorial we will create AlertDialog with custom layout programmatically in Java using Android Studio IDE. We will create a button to show that AlertDialog and show output in a TextView. You can also display this information anywhere or save at some place like shared preferences, files, sqlite etc.
I’ve added two TextViews and Two EditTexts with LinearLayout.
Step 1: Create a new Project or open new project
Step 2: Code
activity_main.xml
<?xml version="1.0" encoding="utf-8"?>
<LinearLayout xmlns:android="http://schemas.android.com/apk/res/android"
    xmlns:app="http://schemas.android.com/apk/res-auto"
    xmlns:tools="http://schemas.android.com/tools"
    android:layout_width="match_parent"
    android:layout_height="match_parent"
    android:orientation="vertical"
    android:gravity="center"
    tools:context=".MainActivity">

    <!--button to show alert dialog-->
    <Button
        android:id="@+id/showAlertDialogBtn"
        android:text="Show Alert Dialog"
        android:layout_width="wrap_content"
        android:layout_height="wrap_content" />

    <!--textview to show input values-->
    <TextView
        android:id="@+id/txtView"
        android:layout_width="wrap_content"
        android:layout_height="wrap_content"
        android:text="Hello World!"
        android:textSize="30sp"/>

</LinearLayout>
MainActivity.kt
package com.jigopost.myapplication

import android.support.v7.app.AppCompatActivity
import android.os.Bundle
import android.support.v7.app.AlertDialog
import android.util.TypedValue
import android.widget.Button
import android.widget.EditText
import android.widget.LinearLayout
import android.widget.TextView

class MainActivity : AppCompatActivity() {

    override fun onCreate(savedInstanceState: Bundle?) {
        super.onCreate(savedInstanceState)
        setContentView(R.layout.activity_main)

        //button
        val mShowBtn = findViewById<Button>(R.id.showAlertDialogBtn)
        //textview
        val mTextView = findViewById<TextView>(R.id.txtView)

        //button click to show alert dialog
        mShowBtn.setOnClickListener {
            val mBuilder = AlertDialog.Builder(this)
            val mLayout  = LinearLayout(this)
            val mTvName  = TextView(this)
            val mTvEmail = TextView(this)
            val mEtName  = EditText(this)
            val mEtEmail = EditText(this)

            mTvName.text  = " Enter Name:"
            mTvEmail.text = " Enter Email:"
            mTvName.setTextSize(TypedValue.COMPLEX_UNIT_SP, 16f)
            mTvEmail.setTextSize(TypedValue.COMPLEX_UNIT_SP, 16f)
            mEtName.setSingleLine()
            mEtEmail.setSingleLine()
            mEtName.hint  = "Name"
            mEtEmail.hint = "Email"
            mLayout.orientation = LinearLayout.VERTICAL
            mLayout.addView(mTvName)
            mLayout.addView(mEtName)
            mLayout.addView(mTvEmail)
            mLayout.addView(mEtEmail)
            mLayout.setPadding(50, 40, 50, 10)

            mBuilder.setView(mLayout)

            //set positive button to alert dialog
            mBuilder.setPositiveButton("Done"){dialogInterface, i ->
                //get text from edit texts
                val name = mEtName.text.toString()
                val email = mEtEmail.text.toString()
                //set text to textView
                mTextView.text = "Name: "+ name + "\nEmail: " + email
            }
            //set neutral/cancel button
            mBuilder.setNeutralButton("Cancel"){dialogInterface, i ->
                dialogInterface.dismiss()
            }
            //show dialog
            mBuilder.create().show()

        }
    }
}
Step 3: Run Project